Google Tag Manager (GTM) for mobile apps was first announced in August this year and has some great implications for app developers.
Perhaps most notably, the product has the potential to overcome one of the most critical challenges in the business: pushing updates to the user base without having to publish a new version on the app marketplace. (if you are looking for information on Google Tag Manager for websites, please check out this guide.)
Typically, from the moment an app is shipped it is frozen, and from that point onwards the developer can only make changes to how the app behaves if the user accepts an update. By shipping an app with GTM implemented, configurations and values may be continuously updated by publishing new container versions through the web-based GTM interface.
In this post, we will cover how to get started with GTM for mobile apps and how to implement Universal Analytics tags using the GTM SDK for Android. As a heads up, this will occasionally get pretty technical, however I believe it is important to understand the product from its fundamentals.
Initial Set Up
Before we get started, some initial configuration steps need to be completed. More detailed instructions on these are available in the Google Developers Getting Started guide, but in a nutshell they include:
- Downloading and adding the GTM library to our app project
- Ensuring our app can access the internet and the network state
- Adding a Default container to our app project
We will hold back on that last part, adding a Default container, until we have created some basic tags and are ready to publish. We will revisit the Default container later in this post.
Create an App Container
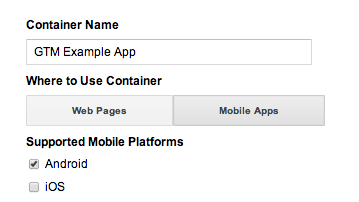
We need to start off by creating a new container in Google Tag Manager and select Mobile Apps as the type. Typically, we will have one container for each app we manage, where the container name is descriptive of the app itself (e.g. “Scrabble App”). Take note of the container ID on top of the interface (in the format “GTM-XXXX”) as we will need it later in our implementation.
Opening a Container
Assuming we have completed the basic steps of adding the Google Tag Manager library to our project, the first thing we need to do before we start using its methods is to open our container.
Similarly to how we would load the GTM javascript on a webpage to access a container and its tags, in an app we need to open a container in some main app entry point before any tags can be executed or configuration values retrieved from GTM. Below is the easiest way of achieving this, as outlined on the Google Developers site:
ContainerOpener.openContainer(

        mTagManager,     // TagManager instance.

        “GTM-XXXX”,       // Tag Manager Container ID.

        OpenType.PREFER_NON_DEFAULT,   // Prefer not to get the default container, but stale is OK.

        null,                    // Timeout period. Default is 2000ms.

        new ContainerOpener.Notifier() {       // Called when container loads.

          @Override

          public void containerAvailable(Container container) {

            // Handle assignment in callback to avoid blocking main thread.

            mContainer = container;

          }

        }

    );
Before we talk about what this code does, let’s hash out the different container types to avoid some confusion:
- Container from network: Container with the most recent tags and configurations as currently published in the GTM interface
- Saved container: Container saved locally on the device
- Fresh vs. Stale container Saved container that is less vs. greater than 12 hours old
- Default container: Container file with default configuration values manually added to the app project prior to shipping
We will talk more about the Default container later on. Back to the code. In this implementation, the ContainerOpener will return the first non-default container available. This means that we prefer to use a container from the network or a saved container, whichever is loaded first, because they are more likely to hold our most updated values. Even if the returned container is Stale it will be used, but an asynchronous network request is also made for a Fresh one. The timeout period, set as the default (2 seconds) above, specifies how long to wait before we abandon a request for a non-Default container and fall back on the Default container instead.
We may change the open type from PREFER_NON_DEFAULT to PREFER_FRESH, which means Google Tag Manager will try to retrieve a Fresh container either from the network or disk. The main difference is hence that a Stale container will not be used if we implement PREFER_FRESH unless no other container is available or the timeout period is exceeded. We may also adjust the timeout period for both PREFER_NON_DEFAULT and PREFER_FRESH, however we should think carefully about whether longer request times negatively affects the user experience before doing so.
Tag Example: Universal Analytics Tags
We have completed the initial set up and know how to access our Google Tag Manager container. Let’s go through a simple example of how to track App Views (screens) within our app using Universal Analytics tags.
Step 1: Push Values to the DataLayer Map
The DataLayer map is used to communicate runtime information from the app to GTM, in which we can set up rules based on key-value pairs pushed into the DataLayer. Users of GTM for websites will recognize the terminology. In our example, we want to push an event whenever a screen becomes visible to a user (In Android, the onStart method is suitable for this). Let’s give this event the value ‘screenVisible’. If we want to push several key-value pairs, we may utilize the mapOf() helper method as demonstrated below. In this case, since we will be tracking various screens, it makes sense to also push a value for the screen name.
public class ExampleActivity extends Activity {
private static final String SCREEN_NAME = "example screen";
private DataLayer mDataLayer;
public void onStart() {
super.onStart();
mDataLayer = TagManager.getInstance(this).getDataLayer();
mDataLayer.push(DataLayer.mapOf("event", "screenVisible",
"screenName", SCREEN_NAME));
}
//..the rest of our activity code
}
We may then simply paste this code into every activity we want to track as a screen, replacing the SCREEN_NAME string value with the relevant name for each activity (“second screen”, “third screen”, etc.).
Note: the container must be open by the time we push values into the DataLayer or GTM will not be able to evaluate them.
Step 2: Set Up Macros In Google Tag Manager
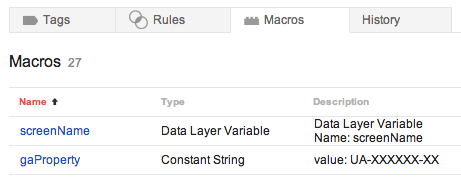
Simply put, macros are the building blocks that tell GTM where to find certain types of information. Some macros come pre-defined in GTM, such as device language or screen resolution, but we may also create our own. First of all we want to create a Data Layer Variable macro called screenName: this is the name of the screen name value we pass along with the event as demonstrated above.
GTM will then be able to evaluate the screenName macro, which can consequently be used in our tags. If we have not done so already, we may also create a Constant String representing our Analytics property ID at this point. These macros are now at our disposal in all container tags.
Step 3: Configure an App View Tag
Let’s set up our Universal Analytics App View tag. Our configurations are visible in the screenshot below (note the use of our newly created macros). The screen name field value of the App View will be automatically populated and corresponds to what we push to the DataLayer as the value of the screenName macro. The gaProperty macro value specifies which Google Analytics property data should be sent to (by reusing it throughout our container, for every Universal Analytics tag, we can both save time and prevent some critical typos).
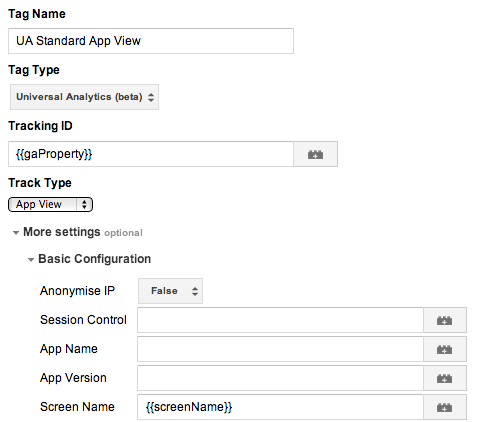
Step 4: Configure a Firing Rule For Our Tag
Finally, we need to set up the conditions under which the tag should execute. Since we are pushing an event with the value “screenVisible” every time an activity becomes visible, this should be the condition under which our tag should fire, as demonstrated below.

Step 5: Save and Publish
We can continue to create other tags at this point. It may be beneficial, for example, to create some Google Analytics Event tags to fire on certain interactions within our app. We should apply the same logic in these instances: We need to push various event values to the DataLayer as interactions occur, and then repeat the steps above to create the appropriate Universal Analytics tags. When we’re happy, all that’s left to do is to create a new version of the container and Publish.

As we ship our app with Google Tag Manager implemented, requests will be made to the GTM system to retrieve our tags and configuration values as we discussed earlier.
Hold on, there was one more thing: the Default container!
Default Containers
When we are finished with our initial Google Tag Manager implementation and feel happy with the tags we have created, we are almost ready to ship our app. One question should remain with us at this point: what do we do if our users are not connected to the internet and hence unable to retrieve our tags and configurations from the network? Enter the Default container.
Let’s back up a little bit. In the GTM world, tag creation, configuration, settings, etc. is primarily handled in the web-based GTM interface. The power of this is obvious: we no longer need to rely on our development teams to push code for every change we want to make. Instead, we make changes in the GTM interface, publish them, and our tags and values are updated accordingly for our user base. This of course relies on the ability of our websites or applications to reach the GTM servers so that the updates can take effect. Here things get a bit more tricky for mobile apps, which partly live offline, than for websites.
To ensure that at least some container version is always available to our app, we may add a container file holding our configuration values to the project. This can be a .json file or a binary file, the latter being the required type to evaluate macros at runtime through GTM rules. We may access the binary file of our container through the GTM user interface by going to the Versions section. Here, we should download the binary file for our latest published container version and add it to our project.
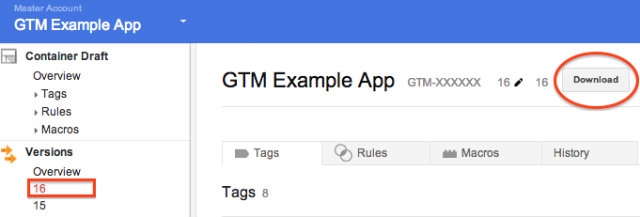
The binary file should be put in a /assets/tagmanager folder and its filename should correspond to our container ID (the file must be located in this folder, and it must be named correctly with our container ID). At this point, we should have both the JAR file and the binary file added to our project as shown below.
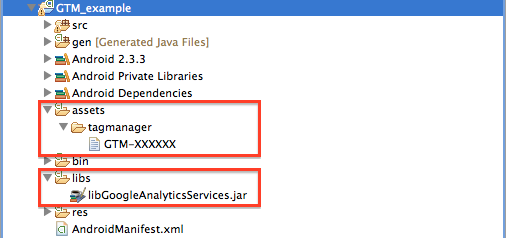
Once this is done, we are ready to ship the app with our Google Tag Manager implementation. As described earlier, Fresh containers will be requested continuously by the library. This ensures that, as we create new versions of our container and publish them in the web-based GTM interface, our user base will be updated accordingly. As a back-up, without any access to a container from either the network or disk, we still have the Default container stored in a binary file to fall back on.
Summary
Let’s summarize what we have done:
- After completing some initial configuration steps, we created a new app container in the web-based GTM interface
- We figured out how to open our container as users launch our app, choosing the most suitable opening type and timeout value (taking into consideration user experience and performance)
- We then implemented code to push an event to the Data Layer as various screens become visible to our users, setting up a Universal Analytics App View tag in GTM to fire every time this happens
- We downloaded the binary file of our container and added it to our app project to be used as a Default container
- Lastly, we created and published our container in GTM
We are now ready to ship our application with GTM implemented!
Closing Thoughts
Google Tag Manager for mobile apps can be an incredibly powerful tool. This basic example shows how to implement Universal Analytics using this system but barely scratches the surface of what is possible with highly configurable apps that are no longer frozen. Simply put, getting started with GTM for mobile apps today sets businesses up for success in the future, I recommend trying it out as soon as possible.
I would love to hear your thoughts around Google Tag Manager for mobile apps. What are your plans for (or how are you currently) using it?

