In this article I will show how to easily rewrite multiple URI addresses in Google Analytics with the help of Google Tag Manager (GTM) macros. The idea for this solution came when I was asked by an e-commerce client to analyze their website, an online electronic store with over a thousand products in hundreds of categories.
The challenge with this client’s analytics account was that 90% of the categories and item names were gibberish, so obviously it was almost impossible to analyze website behavior and content consumption on Google Analytics.
For example the URL for item A was
http://www.thegreatshop.com/default.asp?catid=2DE2700B-A29A-48CA-D17-9F58CF9E76FD&itemid=B5F2AA60-7A13-451A-B532-E6589F178A91Item B didn’t look any much better
http://www.thegreatshop.com/default.asp?catid=98878163-8D17-438C-B75A-692B327A28E0&itemid=37B6B7F6-C408-4331-8034-5A48F8EB493B
A real nuisance.
Before I present my solution, I would like to discuss the two alternative options I considered:
- Change the URL to a clearer one and apply a 301 redirect from the old URL. A very risky solution as this was a new client and they were not ready for drastic changes to the site right off the bat, so I eliminated this option.
- Add ‘search & replace’ filters directly into GA. I eliminated this option because adding them manually to thousands of products and hundreds of categories wasn’t realistic.
Google Tag Manager Macro Definition & Lookup Tables
Just when I started to regret I took on this job, an idea popped into my head: I will play with the URI on the analytics reports using the macro ‘Lookup Table’ in Google Tag Manager! If you are not acquainted with Macros, here is an excellent definition by Simo Ahava:
So a macro is, in essence, a placeholder for some value that you might need in your tags. Most common uses for macros would be to:
- Retrieve a constant string (e.g. your tracking code)
- Retrieve a variable string (e.g. the href attribute of a clicked element)
- Retrieve the result of some simple function (e.g. the date and time of the current visit)
Macros are thus used to call for and to retrieve certain values. You can surely see how they facilitate your day-to-day GTM use, can’t you? It’s much easier to just refer to a macro name rather than having to write the value-retrieving function over and over again.
For example, the macro {{URL}} that comes by default with a GTM installation returns the URL of the current site as it appears in the browser. The macro {{element id}} returns the ID of the element that created an Auto Event and so on…
In our case, the macro ‘Lookup Table’ is actually a function that looks at the value in the macro we put in, and decides what value to return when the macro is called on.
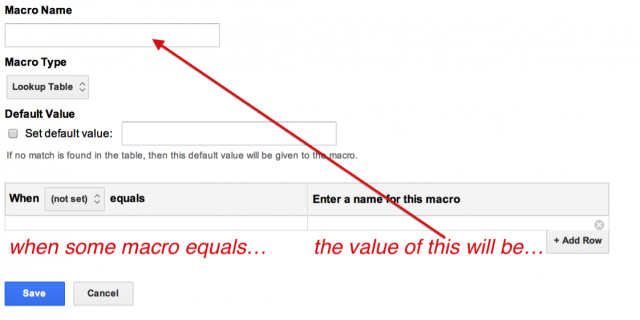
So here is what we’re going to do:
- Create a URL macro that will receive the ugly value of the ‘catid’ parameter
- Create a URL macro that will receive the ugly value of ‘itemid’ parameter
- Create a Lookup Table macro that will change all the ugly ‘catid’ parameters into more meaningful ones
- Create a Lookup Table macro that will change all the ugly ‘itemid’ into more meaningful ones
- Create a Universal Analytics tag that will create a nicer virtual pageview instead of the ugly path that we get as a default
- Go to the macro we created on step 3 and insert all the URLs from the old and new categories with a very cool trick (more details below)
- Go to the macro we created on step 4 and insert all the URLs from the old and new item ids using the same trick
- Lay back and watch the data 🙂
Ready? Lets go!
First let’s create the macros that receive the ugly values of the itemid and catid, for that I created two macros as in the example below:

Now we have to tell GTM that when the macro {{oldCatId}} equals (some gibberish value) and push a much nicer category name into {{newCatId}}. To do that I’ve created a new Lookup Table macro and called it newCatId. Now, in theory, we would have to put in a long list of ugly categories URLs and to each one attach a nice URL that we would want to show as the Request URI in Google Analytics.
Does this look complicated? Of course it does! So here comes Jon Meck’s patent!
Download this table (save a copy to your Google Drive because it’s read only) and put in the URL of the old categories in the cells on the left (notice you write only the name of the category without the ‘&catid=’ string). After that, fill out in the right column the name of the category as you would like it to appear in your Google Analytics reports, then copy the text that’s been created in the green cells and go to the screen where you create the macro in Google Tag Manager.
Now open the developer tool in your browser, go to console and paste the text that you copied from the table right into the console. Hit Enter and… BOOM!! Your table has been filled automatically 🙂 Do the same for the itemid (I called this macro “newItemId”) and thank Jon for his cool solution 🙂
Now the final step: sending the data to Google Analytics. Pay attention to the details so as not to disrupt your data! To send the data we must create a Universal Analytics tag on GTM (or a classic one if you haven’t upgraded yet) and give it the following firing rule:

The reason we don’t want the tag to be on all pages is because the tag is sending virtual pageview to Google Analytics with our new catid and itemid. Not all the pages have these parameters, so if we fire this tag in all pages our homepage will appear as “/?default.asp&catid=&itemid=“ and that’s definitely not what we want. Don’t forget to add an additional Analytics tag that will run on all pages except those containing ‘catid’ and ‘itemid’.
P.S. According to Simo Ahava’s comment below, it is possible to use only the regular pageview tag (that fires on all pages) in this solution. All you need is an intermediate Custom JavaScript Macro, which you refer to in the Document Path field. This macro looks like:
function() {
if({{oldCatId}} && {{oldItemId}}) {
return “/?default.asp&catid={{newCatId}}&itemid={{newItemId}}”;
}
return;
}So this first checks if catId and itemId are present in the URL. If they are, it returns the string you want in the Document Path field, together with the macros from the Lookup Table. If these parameters are NOT in the URL, it returns undefined, and Document Path doesn’t get sent!
Now let’s put the virtual pageview in the Document Path field (this is where the magic happens!) that looks something like this: /?default.asp&catid={{newCatId}}&itemid={{newItemId}}
Now this address:
/default.asp?catid=2DE2700B-A29A-48CA-D17-9F58CF9E76FD&itemid=B5F2AA60-7A13-451A-B532-E6589F178A91
will look like this:
/?default.asp&catid=NicerCategoryName&itemid=NicerItemName
When the tag fires, it calls the newItemld and newCatId macros (Lookup Table functions, remember?) that will return the matching value according to what they receive from the oldltemld and oldCatId macro.
Summary
In this post I attempted to explain how to rewrite a large number of URI addresses in Google Analytics in the easiest possible way. The hardest part of using this method is entering all the gibberish URLs of the categories/items into the spreadsheet table, and to write a nicer name for each one. There is no solution for this other than hiring cheap labor 🙂
I hope this helped you and… happy analyzing!

