Google Tag Manager is truly incredible. The ability to make additions or alterations to your tracking and marketing tags without bothering your developers is a huge game changer in the digital industry. However one small problem still remains… Google Tag Manager (GTM) require at least one additional piece of code on your site before you can start to utilise this ground-breaking way of doing things.
This article provides a step-by-step guide to Tag Manager Injector (TMI), a free Chrome extension designed to make the transition to Google Tag Manager as quick and painless as possible. The extension gives you the ability to run/preview a GTM container on your site without needing to add any JavaScript to your pages. In this article I discuss how this could benefit you and your business and provide a real life example deployed at Eurotunnel.
To illustrate the way businesses often implement Google Tag Manager, let’s take a quick look at a typical GTM implementation process, as shown in the diagram below.

The longest steps here by a country mile are B and C and you’re mostly reliant on the former being completed before you can start to configure your tags in GTM. Imagine the time you’d save if you had the ability to run these two steps in parallel…
Turns out it’s your lucky day!
With Tag Manager Injector (TMI), you can begin configuring your tags as soon as you’ve created your GTM account and container. So let’s introduce the Tag Manager Injector and take a look at our new process: Short ‘n’ sweet!

Success Story
![]() When we eventually decided to try this new extension out on a real client project the results really spoke for themselves. Top of the list was our client Eurotunnel who had just come to us for help with the implementation of Google Tag Manager on their site.
When we eventually decided to try this new extension out on a real client project the results really spoke for themselves. Top of the list was our client Eurotunnel who had just come to us for help with the implementation of Google Tag Manager on their site.
It was the first case we’d had where a container was fully configured and tested before the GTM container snippet was actually live. This brought the completion of the project forward by a whole month, allowing Eurotunnel to start collecting the data they wanted a lot earlier than we anticipated.
A more efficient transition to GTM isn’t the only use for TMI. If you’re looking to leave the dark ages and finally join the tag manager club but are undecided about which one to use, this extension will allow you to preview GTM and experience this amazing tool first-hand – no developers required! This is much better than relying on blogs and reviews etc. to tell you which solution is best for you. While we’re on the subject though, I’d highly recommend GTM 😉
Getting Started
In order to use TMI, follow this link to the Google Chrome Web store and add the extension to Chrome (that’s a Chrome extension, so yes, you have to do it on Chrome):
If you haven’t done so already, you’ll need to create a GTM account and container. You can find instructions on how to do this in this article.
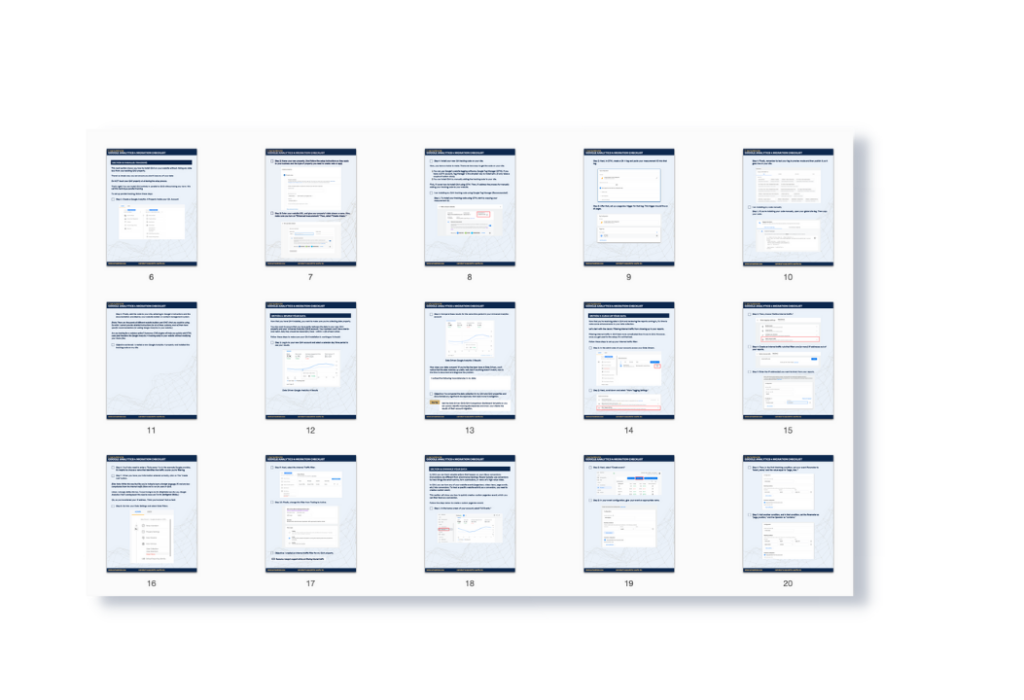
Make sure you make a note of your GTM container ID. To find your GTM container ID, login to GTM, select an account then select a container. There you should see the container ID next to the container name at the top of the interface (see screenshot below).

Navigate to your website and click the TMI icon in the top right corner of your Chrome browser (just besides the URL field) to open up the interface. You should see a screen similar to the screenshot below:

Paste your GTM container ID into the first text field and hit START. You should then get a message telling you that the container is active:

You can easily tell whether or not TMI is active as the extension icon in the top right will show either green for active or red for inactive .
To deactivate TMI, simply open the interface again and hit STOP. You’ll get a message telling you that the container is now inactive:

Warning: Once you activate a container in TMI, it’s injected onto any sites you visit in your browser session until deactivation. It’s recommended that you do any other browsing in a separate Chrome session while TMI is active.
Preview & Debug Your Container Using TMI
GTM’s preview and debug mode operates fine when using TMI allowing you to test out container configurations as normal. Instructions on entering preview and debug mode can be found at the Help Centre.
Once you’ve entered preview and debug mode, activate TMI for the container that you are debugging then navigate to your site. You should see the quick preview frame appear on the page as shown in the example below:

That’s it! If you have any questions or feedback, feel free to drop a comment in the comments section below.