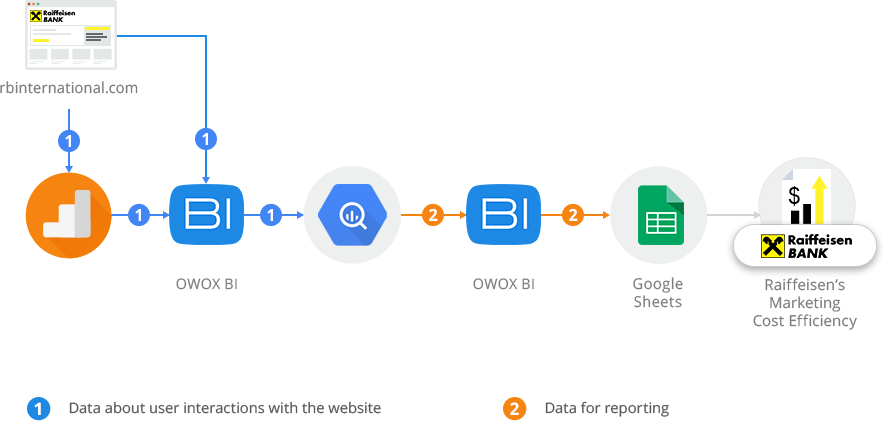
The more useful and relevant your site becomes, the worse it may actually perform. This happens because websites are continuously adding tags to enhance their tracking, optimization or other functionality; this ends up crowding pages with third party tags and may slower the website. For this reason, the Google Tag Manager, a free solution for tag management, is very welcomed, especially by Marketers. In the past, everything was controlled by webmasters, including website tracking, which was highly technical as it required dealing with log files. Then, in 2005, Google made the JavaScript method widely available with Google Analytics, but it still required a technical integration by webmasters as it required adding codes to the website.
With Google Tag Manager, marketers will be able to add, edit or remove marketing and measurement tags without the intervention of webmasters. This will speed the process from the marketing perspective and will free webmasters to work on other important tasks. The power of Google Tag Manager also extends to IT managers, they have more control over tags and a safe place to test how they would affect the website before publishing them.
Google Tag Manager Structure – Accounts, Containers, Tags & Triggers
The structure used by Google Tag Manager is very similar to the one used by Google Analytics. In Analytics, we have accounts that can contain several Web Properties (usually one per website) which can contain several profiles. Below is the hierarchy used by Google Tag Manager:
Accounts
The top-most level of organization. Typically, only one account is needed per company. Tags for all the company’s websites can be managed from this account by creating new containers. In order to create an account visit google.com/tagmanager and signup for the product. To create additional accounts, sign into your existing account, click on Accounts List (top navigation bar) and click on the “Create Account” button shown in the screenshot below.  You will be asked to fill in the account name (use the company name) and whether it will be used for Web or Mobile Apps; then you will be asked if you agree to the Service Agreement. Once you do, your account will be created with a container
Containers
A container holds all the tags for a specific website; as a best practice, it should be named after the website it is being used for. To create a new container select an account and click on the Create Container from the accounts menu on the top-right corner of the specific account list. Once you have a new container, you will get a screen similar to the following. 
Tags
Once you create a container, you can start creating tags for your website. Google provides templates for its own tags and other commonly used third party solutions (e.g. Marin, ArRoll, LinkedIn etc), but it also allows custom tags to be used. Below are some of the tags supported by the tool, for an explanation about each of them, as well as a complete list, check this help center article:
- AdWords Conversion Tracking
- DoubleClick Floodlight Counter
- DoubleClick Floodlight Sales
- Universal Analytics
- GDN Remarketing
- Custom Image Tags
- Custom HTML Tags
- In order to add a tag to a container, navigate to the container, choose the tags section and click on the New Tag button on the top-right corner of your screen. See the top left box on the screenshot above. You will then reach the tag page. In this page, you will be able to choose between the different tag templates described above or a custom HTML tag. As I wrote above, Google created templates for its own tags in order to minimize the possibility of errors.
Triggers
Once you decide which tag to add, you will be prompted with a few details to fill for each tag type: e.g. Conversion ID and Conversion Label for AdWords Conversion Tracking or Web Property ID, Cookie Path and Track Type for Google Analytics. You will also be able to add a trigger to fire the tag. Below is a very simple setting showing how the Google Analytics tag would be configured.
 The Fire On section above will define the triggers under which the tag is fired. For tags that should appear on all pages of the website (like Google Analytics), you would use the default All Pages. Another common usage would be to add tags to the conversion page only, so you might want to add a rule for an URL that matches the page address. So, for example, if your conversion page ends with the expression “thankyou”, you could add a trigger as shown in the screenshot below.
  For more information on Triggers check this help article.
Publishing & Versions
Once tags are added to a container they are not automatically published, they must be “manually” published. Publishing is always linked to a container version, which is a snapshot of the container that can be made at any time. If you click on Versions at the top of your screen, you will see a short summary of your current version and you can click through using the Action button on the right of any version to preview, share publish, export and others. This is an excellent way to keep track of your change history.

Users & Permissions
Users are added to accounts and should be added on a container basis. For each container, there are four types of user access:
- No access: user does not see the container listed in the account.
- View only: user sees the container listed and may browse the tags, rules, and macros in the container, but cannot edit them.
- View and Edit: user may add and edit tags, rules, and macros in the container.
- View, Edit, Delete and Publish: user may add, edit, and delete tags, rules, and macros in the container as well as publish changes to the live site.
- In order to manage user access see the indications in the screenshot below.

Closing Thoughts
In summary, Google Tag Manager is an important tool for online businesses, it makes marketing and measurement easier and more secure. In the words of Google:
“Google Tag Manager allows you to conveniently manage tags (such as tracking and marketing optimization tags) on your site. You can add and update AdWords, Google Analytics, Floodlight and non-Google tags from the Google Tag Manager user interface instead of editing site code. This reduces errors, frees you from having to involve a webmaster, and allows you to quickly deploy tags on your site.”
Last, please note that this is a quick step by step guide to get up and running. If you would like a more comprehensive description of the tool you should check the Analytics Academy course and/or the official implementation guide.
- In order to manage user access see the indications in the screenshot below.